
[ad_1]
Synopsis: A dovetail inside a dovetail, the houndstooth’s pins taper to a pointy level, making the joint very enticing but in addition difficult to create. Frank Strazza cuts them with hand instruments; a handsaw most notably. And though the joint appears fragile, it’s truly very sturdy.
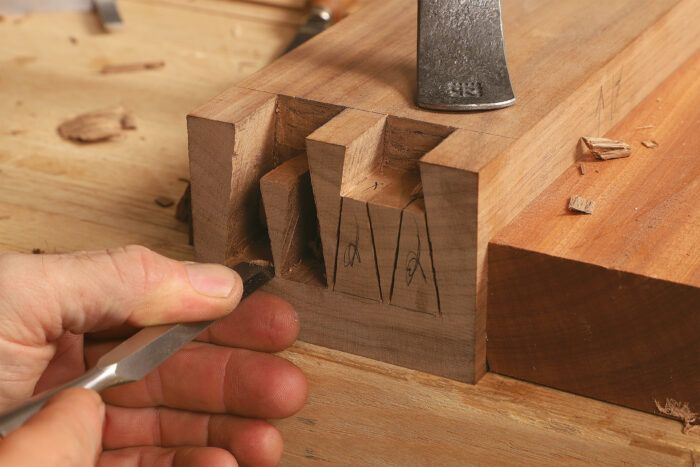
The houndstooth is a dovetail inside a dovetail; its pins, tapering to a rapier level, give an already lovely joint one other dimension of visible attraction—and so they make it more difficult to create. I can’t bear in mind after I first noticed houndstooth dovetails, however I liked them from the beginning, and I’ve spent years using them in customized workbenches. I reduce the joint completely with hand instruments. The handsaw is the one software capable of create the fantastic needlepoint pin sockets that distinguish the houndstooth. Individuals typically query the power of the joint due to the seeming fragility of the slender factors. However in fantastic previous English furnishings, the place needlepoint dovetails originated, they’ve stood the check of time. You need to use the houndstooth on drawers and circumstances, however I’ll show the method utilizing the entrance rail and finish cap of a workbench. I typically use contrasting woods for this joint to intensify its graphic influence, and right here I’m utilizing curly laborious maple and walnut. Utilizing species so totally different in density can also be advantageous as a result of the walnut pins will compress barely when they’re fitted to the maple tail board.
A useful rabbet
Step one is to create a rabbet on the top of the tail board. This may assist find the pin board later, however I do it largely to scale back the thickness of the tail board so I received’t have a lot to chop away. With a knife and sq., mark a line throughout the tail board’s inside face and on every of its two edges 2 in. from the top. This distance will even be the complete size of the tails, however don’t mark it on the skin face but. Subsequent, with a marking gauge, scribe the depth line of the rabbet.
Noticed the shoulder of the rabbet with a tenon noticed or dovetail noticed. Then take away the waste with a chisel. You possibly can noticed out the waste, however I discover it’s simply as fast and correct to chisel it away. Begin by splitting alongside the grain properly above the depth line. Watch carefully and ensure the cut up doesn’t dive down previous the road. If the grain goes pretty straight, you’ll be able to proceed nearer to the road. As you strategy the road, begin working throughout the grain. I clear up the cheek of the rabbet with the appropriately named rabbet block airplane.
Tails begin with a rabbet  
|

Tails format
The subsequent step is to put out the tails, which is pretty simple. There are two massive tails, every with a small pin socket reduce inside it. Begin by making three tick marks on the finish of the board, one within the center and the others 1⁄2 in. from every edge; these are the one measurements that you must create the 2 tails. Earlier than marking the angles, carry the baseline throughout the face of the board in pencil. Subsequent, mark the angles with a sliding bevel on the face of the board. Then use a mixture sq. to hold the angled traces sq. throughout the top of the board.
Subsequent lay out the pin socket inside every tail. I discover that having the socket two-thirds the size of the massive tail makes a visually pleasing joint; I take advantage of a pair of dividers to step off these thirds and mark the socket’s baseline. After marking the angles and the baseline with a pencil, come again with a sq. and a knife to mark the baselines on these pin sockets in addition to on the massive tails.
Tails format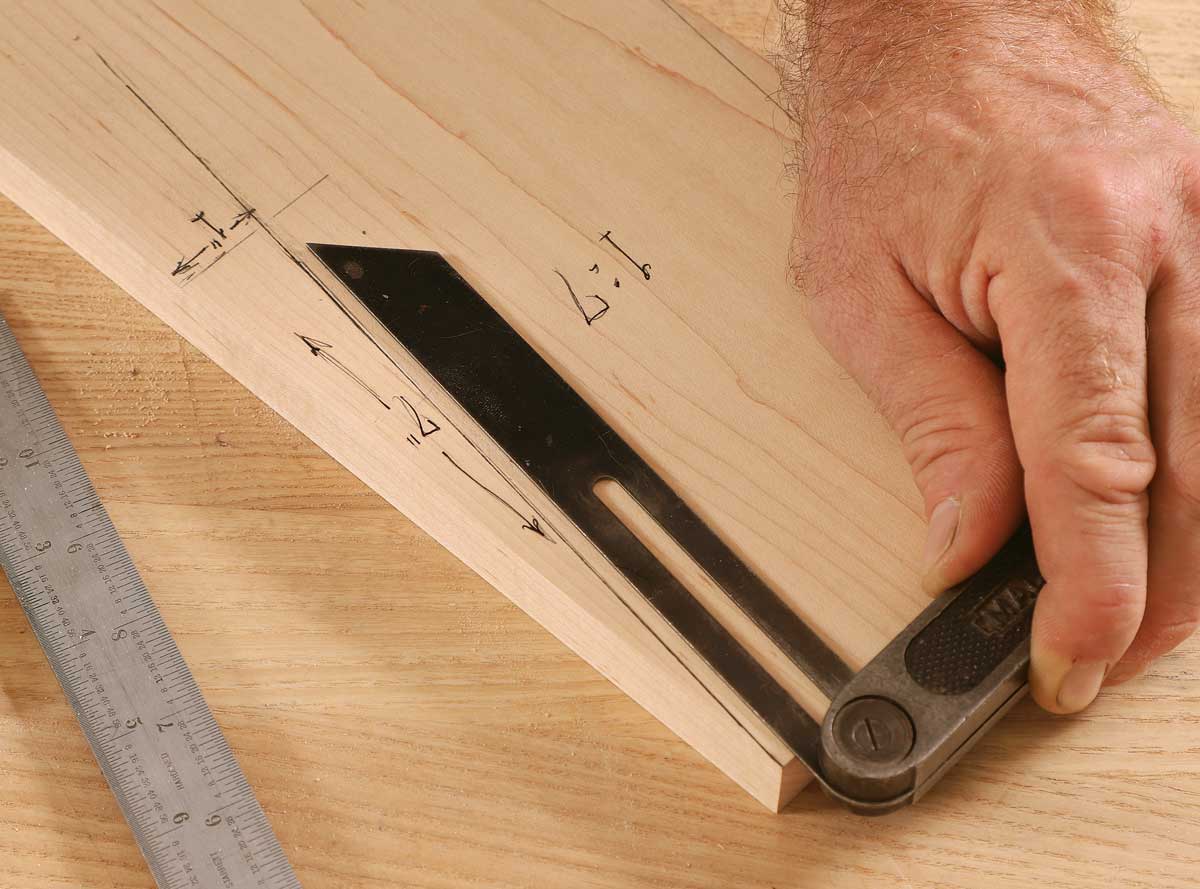  
|

Reduce the tails
As you start sawing the angled cheeks of the tails, remember the fact that these cuts have to be sawn completely sq. throughout the top of the board or the joint is not going to match. If the dovetail angles are barely off, it received’t matter as a lot, as a result of they’ll merely be transferred to the pin board.
For consistency’s sake, I make all of the cuts which are angled in a single path, then reset my physique place and make all of the cuts angled within the different path. To make the second reduce of every pair that varieties a needle level, merely put the noticed within the first kerf, press your thumb in opposition to the noticed plate for steering, and reduce the angle going within the different path.
 From Tremendous Woodworking #298
To view all the article, please click on the View PDF button under.
Obtain FREE PDF
[ad_2]