
[ad_1]

Are you able to sand? This step could be a bit tough however so long as you are taking it gradual, all the pieces will work out! This weblog will present you some warning indicators to maintain an eye fixed out for whereas sanding your veneer masterpiece.

After you are taking the piece out of the clamps, gently take away the tape off of the entrance. When pulling the tape off, don’t pull too quick or too aggressively as a result of the fibers may be pulled out. If massive chunks are pulled out, dab just a little glue, press the piece again in place, and tape it down.

Since veneer is skinny, it’s attainable to sand by means of it so I begin with 120 grit. For bigger items I take advantage of a pad sander however smaller items I take advantage of a sanding block. The wooden grain goes in all totally different instructions so it’s not attainable to at all times sand with the grain. So long as you sand evenly the cross scratches wont be apparent. Sand till the glue is eliminated after which change to increased grits. I take advantage of 120, 220, after which a grey scotch pad.

Keep in mind that totally different species have totally different traits. On this piece the darkish brown wenge is thicker and tougher than the dyed blue poplar so there’s a likelihood that I can sand by means of the poplar earlier than the wenge though the sanding block is flat.

For areas the place the fibers had been pulled out by the tape, evenly sand by hand going with the grain of the wooden till the marks are gone. Don’t sand too exhausting because the wooden is thinner in that space.

Sand just a little after which take an excellent take a look at the piece. Right here you’ll be able to see the darker inexperienced areas, that’s glue that seeped by means of the pores of the wooden and nonetheless must be sanded.
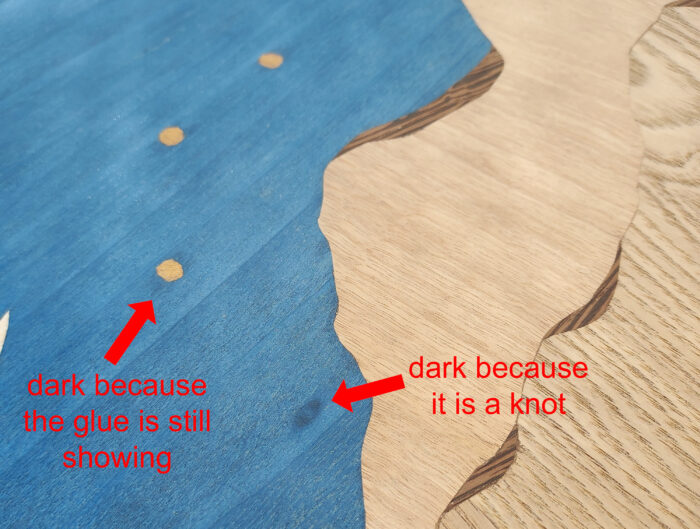
Know what to search for when sanding. A darkish spot might simply be a knot and doesn’t want anymore sanding. Nevertheless a darkish spot subsequent to a seam could possibly be glue that’s not absolutely sanded but.

Darker or totally different shade might additionally imply that the wooden is about to be sanded by means of. The world on this image is ever so barely extra yellow than the remainder of the wooden, that’s the glue that’s about to be uncovered. Should you see this, don’t sand anymore in that space.

Cross scratches may be apparent on some species of wooden however not all. If cross scratches are actually seen, you’ll be able to spot sand with a small piece of 220 grit evenly till easy.
Go slowly and test your piece usually. You’ve received this!
[ad_2]