


[ad_1]
This Luminar Neo overview will cowl Skylum’s newest picture enhancing software program which is on the market for Mac and Home windows.
With its headline AI-powered instruments and straightforward to make use of interface, Luminar Neo has been the 12 months’s most eagerly anticipated launch – however does it stay as much as its hype?
Unique Low cost


Highly effective AI enhancing instruments enhance photographs in much less time. Inexpensive one-time pricing and thrilling future updates. Use coupon code shotkit10neo to avoid wasting $10.
There’s nonetheless lots of confusion surrounding the function overlap of Luminar Neo with Luminar AI, launched solely a 12 months earlier.
With the most recent model, Neo presents a strong set of options that helps it step forward of its predecessor, however continues to be lacking performance to make it solely redundant.
Other than all its flashy AI options, will photographers genuinely discover Luminar Neo a helpful enhancing app, or is it destined to be a transient gimmick for the Instagram technology?
On this overview, I reply all the commonest questions that will help you resolve whether or not you can purchase Luminar Neo in 2022.
All data is predicated on Luminar Neo v1.0.6 launched on Could 12, 2022.
What’s Luminar Neo?
- Inexpensive one-time value
- Straightforward and enjoyable to make use of
- Efficient one-click presets
- Spectacular AI instruments
- Glorious portrait enhancers
- Quick RAW picture imports
- Promising layer-based workflow
- Particularly helpful as a Lightroom Plugin
- Sluggish to reply (initially)
- Restricted picture administration options
- Restricted print and export choices
- Disappointing cellular app
- Lack of processing indicator
Save $10 by utilizing Coupon Code shotkit10neo
Luminar Neo is a robust picture editor for Mac and Home windows, powered by AI applied sciences that may simplify complicated picture enhancing duties, making them quick and enjoyable.
Headline AI options embody the ‘god-like’ capability to relight a scene, exchange the sky, take away powerlines and mud spots, and carry out varied jaw-dropping portrait enhancements in simply a few mouse clicks.
The primary attraction of Luminar Neo is the chance for an entire novice to hold out immensely complicated picture enhancing duties with a few clicks. It’s additionally helpful for extra skilled photographers who need to save time or experiment with their picture enhancing.
Along with this synthetic intelligence wizardry, Luminar Neo supplies a strong number of core enhancing instruments which rival different well-liked picture editors.
Quite a few Presets are equipped, (with extra obtainable to obtain/purchase), which apply instantaneous picture results to pictures to change their look – AI recognises the picture and suggests appropriate ‘For This Picture’ Presets to avoid wasting time.
Luminar Neo pairs up with Luminar Share, a fundamental cellular app for iPhone and Android gadgets that lets you wirelessly switch your smartphone photographs to be edited within the desktop Neo software program, or vice versa to be shared in your favorite social media community.
You can even set up Neo as a plugin for Photoshop and Lightroom Basic, permitting it to load from inside their respective interfaces.
That is helpful if you wish to preserve utilizing the DAM functionalities of your present LRC catalogue, whereas benefiting from the AI instruments in Neo, for instance.
Luminar Neo Evaluation (Up to date for Could 2022)
Skylum launched Luminar Neo in February 2022 with the intention of offering frequent updates.
This Luminar Neo overview is predicated on the most recent model 1.0.6, which was launched on Could 12, 2022, with Masks AI, Histogram and bug fixes.
1. Set up & Setup
After downloading and launching the Luminar Neo installer, you’re given the choice to put in Neo as a plugin for Photoshop and Lightroom Basic (in the event you’re already an Adobe person).
Surprisingly sufficient, you’re now not capable of set up third-party plugins in Luminar Neo (corresponding to Topaz Gigapixel, for enlargements) – one thing you had been capable of do with Luminar AI. Hopefully, we’ll see this in a future replace.
This system takes up 2.84GB of house on my Mac’s arduous drive, which appears common when in comparison with different picture editors.
When the set up is full and also you’ve created a Skylum account, you’re proven a QR code which installs the companion cellular app Luminar Share.
2. Importing & Shopping Pictures


Getting photographs into Neo is straightforward and quick.
Getting photographs into Luminar Neo is useless easy and a refreshing expertise for anybody who’s ever tried utilizing Lightroom for the primary time.
Clicking the Add Photographs button does precisely that – you select a folder or number of photographs in your arduous drive, click on Add, after which every part all of the sudden seems in your Luminar catalogue.
Photographs are added impressively shortly on my 2021 MacBook M1 (32GB RAM) – testing on my spouse’s 2020 Macboom Air with 16GB of RAM was additionally equally quick.
It’s vital to notice that photographs aren’t actually ‘imported’ into Luminar Neo – they’re really being ‘referenced’ of their unique location, very similar to a file browser. This has sure distinct benefits and drawbacks.
The primary caveat to this file browser expertise is that the photographs must exist someplace exterior Neo, or they seem as ‘lacking’.
Which means that you’re unable to import photographs to Neo out of your digital camera’s reminiscence card until: a) you’re keen to maintain the cardboard within the card reader till you’re completed with the photographs, or b) you switch the photographs to your arduous drive first, then add the photographs to Neo from that new location.
Confused? Mainly, when your photographs are moved or deleted in your arduous drive (exterior to Luminar Neo), the identical factor occurs inside Neo.
If, nevertheless, you delete a picture from inside Luminar Neo, it’s added to a ‘Luminar Trash’, with the unique picture remaining intact exterior of Neo.
Software program corresponding to Lightroom, nevertheless, employs an precise picture importing course of which creates a reproduction model of the file inside a separate catalogue, which means any exterior adjustments received’t have an effect on the catalogued picture.
For a lot of photographers, Luminar Neo’s file browser method to file administration will likely be a breath of recent air – there’s near zero wait time for photographs to seem within the software program, able to be edited.
Nevertheless, for skilled photographers who want a direct option to get photographs off their SD card into enhancing software program, Luminar Neo isn’t an acceptable selection.
It’s additionally value noting that you could add photographs from exterior arduous drives and even network-attached storage (NAS), however as quickly as you detach the gadgets, Neo will now not have the ability to present them.
3. Picture Organisation


Organisation choices auto populate relying in your actions.
Ignoring the restrictions on importing from non-permanent gadgets/places, you need to admire the simplicity of picture administration in Luminar Neo.
On the left of the display screen, the ‘Catalog’ module consists of 5 places which auto-update based mostly in your actions:
- All Photographs
- Single Picture Edits
- Not too long ago Added
- Not too long ago Edited
- Trash
Hovering over every title reveals the variety of photographs in every case, and ‘Not too long ago Added’ and ‘Not too long ago Edited’ supply drop downs which reveal the dates the actions had been carried out.
Underneath this, the ‘Folders’ degree homes any folder out of your arduous drive that you just add to Luminar Neo.
Lastly, there are the ‘Albums’, which behave equally to Lightroom Collections, permitting you to compile collections of varied photographs that exist already in your Neo catalogue.
You possibly can add a number of photographs to an album or create a brand new one by deciding on all of them and right-clicking to disclose the choices. Oddly, you may’t drag and drop the photographs into the Albums panel to create new albums.
4. Catalog Interface


Proper-clicking on photographs reveals varied choices.
Luminar Neo Catalog’s single picture view reveals a filmstrip beneath – right-clicking photographs within the single view or throughout the movie strip reveals varied choices:
- Set Flag
- Changes
- Export
- Share
- Open In
- Go To
- Create Album
- Transfer to Luminar Trash
- Present in Finder
Other than the self-explanatory, ‘Set Flag’ lets you Favorite, Reject or Unmark, utilizing the identical shortcut keys as Lightroom, and ‘Changes’ can help you Sync, Copy or Paste any picture edits made throughout different photographs.
‘Open In’ lets you open the picture in varied apps chances are you’ll already personal: Photoshop, Lightroom, Photographs, Parts and Aurora HDR.
There’s additionally a coronary heart icon to favorite, an ‘X’ to reject and a watch icon which reveals a earlier than (unedited) model of your picture, though I nonetheless choose the implementation of the Earlier than/After device in Luminar AI.
One slight annoyance is the frustratingly slim facet scroll bar, which solely comes into partial view once you transfer your mouse’s scroll wheel.
5. Presets Interface

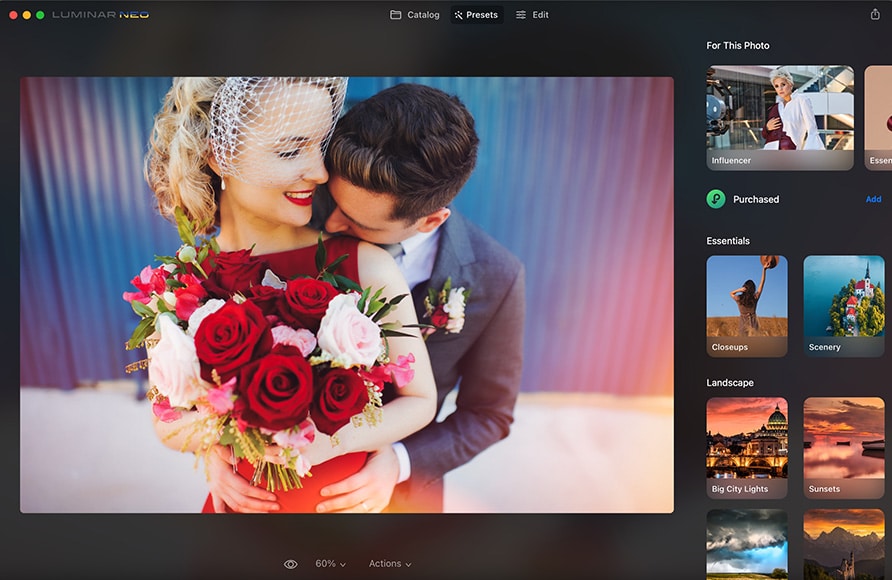
The software program intelligently recognises the picture comprises a woman’s face and recommends portrait presets to go well with.
Subsequent to the ‘Catalog’ module is ‘Presets’ – clicking this reveals a number of thumbnails with considerably ambiguous titles, like ‘Experimental’ and ‘Influencer’.
These presets had been the headline function of Luminar AI (named ‘Templates’), promising to avoid wasting hours of fiddling round with sliders to realize the specified look.
The ‘For This Picture’ presets are your first style of synthetic intelligence coming to your rescue in Luminar Neo, predicting the one-click ‘look’ that will greatest complement your picture, based mostly on its perceived contents.
In apply, in case your picture comprises an individual, ‘For This Picture’ will present presets greatest fitted to portrait pictures. If the picture is of a panorama, the AI suggestion will likely be presets corresponding to ‘Surroundings’, ‘Sunsets’ or ‘Straightforward Landscapes.’
Clicking into every primary preset class reveals varied extra related presets, and so begins the testing course of.


Clicking a preset title reveals different related presets.
Relatively than complicating the method of picture enhancing, the Luminar Neo Presets panel appears to have been designed to encourage experimentation – ‘Influencer’, ‘Cozy Den’ and ‘Winter Refuge’ imply nothing till they’re clicked.
Don’t just like the impact? Merely click on the arrow to return to the unique, or click on the center icon so as to add it to your favorite presets.
Bizarrely, there’s no choice to fine-tune the presets in Luminar Neo like there was in Luminar AI – you both apply the preset in its entirety…. otherwise you don’t.
With the ability to ‘again off’ the results of a preset could be a welcome function, so hopefully we see this added to Neo in a future replace.
6. Edit Interface
The ‘Edit’ module homes all of the handbook and automatic enhancing instruments of Luminar Neo. In its ‘Instruments’ panel, you’ve bought the next:
Necessities
- Develop
- Improve AI
- Erase
- Construction AI
- Colour
- Black & White
- Particulars
- Denoise
- Panorama
- Vignette
Artistic
- Relight AI
- Sky AI
- Environment AI
- Sunrays
- Dramatic
- Temper
- Tonight
- Matte
- Mystical
- Glow
- Movie Grain
Portrait
- Portrait Bokeh AI
- Face AI
- Pores and skin AI
- Physique AI
- Excessive Key
Skilled
- Supercontrast
- Colour Concord
When clicked, every of the instruments reveals a number of sliders and sub-menus.
Something with a slider invitations you to experiment, with the partially hidden sub-menus containing choices for once you’re extra snug with the fundamental performance of every device.
These coming from extra professional-photographer-orientated picture enhancing software program could poopoo the considerably hodgepodge organisation of the instruments, however in the event you’re new to picture enhancing, the format is user-friendly and shortly turns into acquainted,
Something with ‘AI’ after its title denotes one thing with a really particular celebration trick – extra on these later.
Subsequent to ‘Instruments’ is the ‘Edits’ panel, which is sort of like Lightroom’s Historical past device, protecting observe of every edit you’ve made to the picture.
You’re additionally introduced with one other eye icon for a earlier than/after, a revert arrow to undo every particular edit, and a pen icon, which lets you make native changes like creating masks so as to add/take away results.
One factor I discovered somewhat complicated was the truth that any preset you apply to your picture will likely be proven within the ‘Edits’ panel, damaged up as particular person steps of the edit.
e.g. the ‘Nighthawks’ black and white Preset applies ‘Black & White’, ‘Particulars’, ‘Improve AI’, ‘Construction AI’, ‘Face AI’, ‘Denoise and Develop’ – I assume this will change barely relying on the contents of the picture.


Presets might be seen within the Edits panel as particular person edits.
Whereas this enables for some granular management over the preset, it’s tough to inform what variations the person edits really made to your picture – selecting to manage every one seems like a stab in the dead of night.
You’ll additionally discover ‘Layers’ on the left of the ‘Edit’ module – clicking the + icon reveals a number of overlays which you’ll add to your picture to provide varied results: ‘Flares’, ‘Gentle Leaks’, ‘Sparklers’ and ‘Stardust Bokeh’.
You can even load any picture out of your arduous drive to make use of as a layer for a double publicity impact. Any layer’s opacity and mixing mode might be altered to realize your required look.
These hoping for a real layer-based enhancing expertise akin to Photoshop or ON1 Picture RAW will likely be upset, but when all you need is a straightforward option to experiment together with your photographs, Neo comes up with the products.
7. Customary Modifying Instruments


Clicking instruments reveals varied choices for full handbook management over enhancing.
For photographers who prefer to take a handbook method to their picture enhancing, the Develop panel is the place all of it begins – ‘Publicity’, ‘Highlights’ and ‘Shadows’ are acquainted, whereas ‘Good Distinction’ is exclusive to Luminar, controlling each highlights and shadows in tandem to present your picture a pleasant increase.
Underneath that, ‘Blacks & Whites’, ‘Curves’, ‘Sharpness’, ‘Noise Discount’ and ‘Rework’ are self-explanatory, whereas ‘Colour’ refers to temperature and white stability, and ‘Optics’ fixes lens distortion and vignetting.
(In keeping with a Skylum rep who talked to PCMag, Luminar Neo features a database of lens and digital camera profiles which are used behind the scenes for these varied optical corrections. For something that doesn’t exist within the database, it makes use of common algorithms.)
Underneath the ‘Develop’ panel, there’s a combination of AI-powered instruments and extra acquainted commonplace ones corresponding to ‘Vignette’ and ‘Particulars’.
Confusingly, ‘Colour’ exists right here too however offers with ‘Saturation’, ‘Vibrance’ and the elimination of color casts.
‘Erase’ comprises two of Luminar Neo’s newest instruments inside its drop-down: ‘Take away Powerlines’ and ‘Take away Mud Spots’, each of which work much like Photoshop’s content-aware spot therapeutic device, albeit however with no further clicks.
Additionally of word is the ‘Panorama’ device, which lets you dehaze a photograph, add the phantasm of a photograph taken at golden hour and even improve the foliage in a scene.
The explanatory labelling of instruments is Skylum try to make the picture enhancing course of extra accessible to the typical particular person. Whereas in Lightroom, you’d must twiddle with color temperature, readability and varied different instruments to get a golden hour impact, in Luminar Neo, you will get the identical lead to a single click on.
The ‘Artistic’ panel homes instruments that you really want to experiment with to grasp their impact, regardless of explanatory names corresponding to ‘Dramatic’, ‘Temper’ and ‘Mystical’.
My favorite is the ‘Sunrays’ device, which nonetheless blows my thoughts regardless of being a number of years previous. The flexibility to put a practical solar in your picture, and have the solar’s rays wrap round or poke by means of objects as if the complete scene had been three dimensional is solely unbelievable.


Numerous choices finetune the look of the solar rays.
The ‘after’ picture above is simply from making use of the default sunrays settings – from right here, you should use varied different sliders to fine-tune the look to your desire – see screenshot above which reveals the choices.
The ‘Portrait’ panel comprises principally AI instruments, and at last, the ‘Skilled’ panel, which homes ‘Supercontrast’ and ‘Colour Concord’.
‘Supercontrast’ lets you modify the highlights, midtones and shadows distinction individually, then use stability sliders to fine-tune the adjustment.
‘Colour Concord’ offers with ‘Brilliance’ and ‘Heat’, which appear much like ‘Saturation’ and ‘Colour Temperature’ discovered elsewhere within the panel.
Underneath this, you’ve bought ‘Colour Distinction’, ‘Cut up Colour Heat’ and ‘Colour Stability’, which lets you individually modify the colors within the shadows, midtones or highlights.
8. AI Modifying Instruments

Practical portrait manipulation is properly throughout the grasp of anybody. Picture: Maria Lysenko
OK, so that is the place all of the enjoyable begins.
When you’ve learn another Lumnar Neo overview, you’ve little question already been bombarded by photographs of skies being changed and faces slimmed – it’s straightforward to turn into desensitized by simply how extremely easy and reasonable complicated picture manipulation has turn into.
In a nutshell, Luminar Neo affords a set of non-destructive RAW enhancing instruments powered by synthetic intelligence that permits you to perform complicated enhancing duties in simply a few clicks.
Whereas a number of of Luminar Neo’s much-touted AI enhancing instruments are literally obtainable in some type or one other in Photoshop and elsewhere, the best way they’re introduced in Neo is rather more user-friendly.
Right here’s the present number of AI instruments, in addition to a pair we’re eagerly awaiting:
- Masks AI
- Portrait Background Remover AI (Coming quickly)
- Crop AI
- Improve AI
- Construction AI
- Relight AI
- Sky AI
- Environment AI
- Portrait Bokeh AI
- Face AI
- Pores and skin AI
- Physique AI
I’ve examined all of the obtainable instruments and may verify that they work exceptionally properly within the majority of instances.
As knowledgeable photographer with over 10 years of expertise enhancing photographs, I’ve no use for sure AI instruments supplied by Luminar Neo.
I can obtain related outcomes to ‘Crop AI’, ‘Improve AI’ and ‘Construction AI’ manually by utilizing instruments present in the usual adjustment panels.
Issues like including reasonable bokeh to a picture, eradicating a background or relighting a scene (controlling foreground and background brightness), I can positively deal with, however it takes appreciable time to do correctly.
Nevertheless, I draw the road at changing a complete sky, altering the form of a topic’s physique or performing delicate facial retouching. That is the realm of knowledgeable retoucher with years of expertise.
With Luminar Neo, you may obtain all of the above in a few clicks – generally, with only one click on, like within the instance of the Eiffel Tower beneath.
I may present you earlier than and after photographs of the results of those AI instruments, however to be trustworthy, they’re all greatest illustrated proper right here on the Luminar homepage – you may even click on and work together with a few of the instruments in real-time.
Out of all of the AI-powered instruments, Sky AI continues to be my favorite and most spectacular. Whether or not your picture is a pure panorama or an city scene with folks and buildings, Neo does a jaw-dropping job of swapping out the sky and relighting the scene to go well with.


100% zoom highlights the fragile masking of latest sky by means of the tower.
Even when your unique picture is a cloudless scene at noon, you may make it appear to be a sundown shot in a few seconds.
You possibly can see within the screenshot above the unbelievable degree of element retained by the Sky AI device – each hole within the Eiffel Tower reveals the substitute sky by means of it! Cloning and masking one thing like this in Photoshop would take hours and a really expert hand.
I’m additionally impressed with the Portrait enhancement instruments which might carry out edits to faces and our bodies that would rival even the most effective skilled retouchers.
I can see the portrait manipulating options being helpful for shortly enhancing selfies to be shared on social media – issues like whitening enamel, smoothing pores and skin and even altering eye color might be carried out in a few seconds with Luminar Neo.
Other than the power to slim faces, darken lips and whiten enamel, by far probably the most helpful software for my part is the power to manage the face gentle even in photographs of a number of folks – that is extremely useful for me when enhancing household teams, with the software program controlling the brightness of every face within the picture.


You possibly can see within the ‘After’ picture above how the software program makes use of synthetic intelligence to recognise every of the topics’ faces for me to manually add the Face Gentle function with the slider.
(When you look carefully, you’ll discover the second lady’s face is unaffected by the device, presumably as a result of the Face Gentle device has introduced the publicity up on the opposite women’ faces to match hers.)
One other useful gizmo which is unique to Luminar Neo is the Portrait Bokeh AI function, which utilizing AI to recognise the topic(s) in your picture, separating them from the background so a fake-bokeh might be utilized (blurring the background).


Portrait Bokeh AI lets you management the background individually from the foreground to introduce a faux bokeh impact which might be manually adjusted utilizing a masks (proven in purple).
Portrait Bokeh AI is beneficial for photographers who don’t personal costly ‘quick’ lenses, or when photographing teams corresponding to within the instance above, the place utilizing a big aperture would usually render a few of the topics out of focus.
One other key function of the most recent Luminar Neo launch is the long-anticipated Masks AI, which makes use of a neural community to detect as much as 9 separate components in a photograph: folks, skies, structure, transportation, water, flora, mountains, pure floor, and synthetic floor.
In different enhancing software program, masking includes a tedious technique of manually ‘portray’ areas with a masking brush. That is now not vital in Luminar Neo, with the Masks AI doing all of it for you robotically… though with blended outcomes.
In apply, I discovered that the device did a blended job of figuring out components in a photograph – as you may see within the screenshot beneath, it appropriately recognised a human, sky, flora and mountains, however incorrectly noticed structure and man-made floor.
Clicking every of the weather to view the masks revealed additional inconsistencies – whereas the topic and sky had been spot on, the opposite components weren’t so correct.
That is the place the handbook instruments are available, with the brand new Gradient and Radial masks used along side the common brush permitting you to fine-tune every part.


AI Masks appropriately identifies some components in picture.
I just like the route Masks AI is taking the software program, however admit that there’s nonetheless some option to come. It does a good job when the picture comprises very distinct components, however in fact, this isn’t all the time the case with pictures.
One good function of Masks AI is the power to repeat and paste changes to subsequent photographs, with masks making use of changes solely to the identical masked areas – i.e. it intelligently recognises the identical ingredient in every picture.
9. Output and Sharing


Sharing choices are positively restricted.
When you’ve carried out enhancing your photographs, chances are you’ll be questioning what subsequent – how do you get your photographs out of Luminar Neo?
The reply lies in a tiny share button situated within the high proper nook of Neo – clicking it reveals 4 sharing choices: ‘Disk’, ‘Messages’, ‘Mail’ or ‘Share to Machine’ by way of the companion app.
Why Skylum selected to not embody all these choices in a devoted export module baffles me.
One other weird omission is any devoted print module – the one option to print photographs from Luminar Neo is by clicking File > Print within the high menu, which exports your chosen picture to your laptop’s default print app.
The shortage of export and print choices is all somewhat anti-climatic. After making your photographs look superb with all the assorted AI instruments, you’re left questioning why Skylum isn’t as excited as you to share or print them!
For skilled or eager hobbyist photographers, the shortcoming to manage export settings or the print course of will likely be a deal-breaker.
Nevertheless, many photographers received’t care. It’s a easy course of, and on the finish of the day, you’re nonetheless capable of get your photographs out of Neo to retailer, share or print.


Choosing Print from the menu simply launches your default OS print display screen.
The choice to ‘Share to Machine’ is an odd one. You’re instructed to scan a QR code utilizing your cellphone to attach the Luminar Share app to the desktop Neo software program.
From right here, you may ‘Ship Photographs to Luminar Neo’ or ‘Mirror Luminar Neo’ – the latter choice permits you to see any edits you make to your picture in real-time.
At first, I dismissed the companion app as fully ineffective, however in time I realised its enchantment to Instagrammers specifically as a option to share Luminar Neo creations on Instagram in fewer steps. It’s additionally a helpful direct option to switch any photographs shot in your cellphone to Neo.
10. Efficiency

AI instruments trigger very quick CPU spikes.
Since testing a buggy and frustratingly gradual early entry model for my preliminary (scathing) Luminar Neo overview, I’ve to say issues have improved within the efficiency division.
Nevertheless, there are nonetheless some points with pace, most notably once you apply presets or use any of the processor-intensive AI instruments for the primary time.
We had been promised a a lot quicker expertise with Luminar Neo when in comparison with its predecessors. Whereas I admit the AI instruments are definitely faster than Luminar AI, there’s nonetheless room for enchancment.
Clicking ‘Sky AI’, for instance, includes a few seconds look forward to the brand new sky to be added. Nevertheless, any subsequent skies are inserted virtually immediately.
Luminar Neo’s imaging engine wants a few seconds to analyse the contents of your picture – when that’s full, making varied adjustments throughout the identical device is a comparatively quick and easy course of.
In testing, I used Mac OS’s Exercise Monitor to see what’s taking place beneath the hood of Luminar Neo, and positive sufficient, the AI instruments trigger a pointy spike in CPU utilization, which shortly dissipates to regular ranges.
Because the CPU spikes are so short-lived (2-4 seconds), they don’t have an effect on the soundness of any purposes you’ll have operating within the background. Nevertheless, these spikes could have been the rationale for the software program to sometimes crash like Lightroom and another processor-intensive enhancing software program.
One factor I wish to see in Luminar Neo is a few sort of indication that the software program is processing a process – it may be fairly disconcerting to be ready with out realizing if something is definitely taking place. A easy spinning wheel on the cursor would suffice.
Other than the headline AI options, every part else capabilities properly with good responsiveness and easy transitions.
There’s little to no delay when switching between the ‘Catalog’, ‘Presets’ and ‘Edit’ modules, which is one thing Lightroom often struggles with.
Including photographs to Luminar Neo is lightning quick, though you do want to attend a second for the picture to render if you wish to edit it.
All in all, so long as your laptop meets and ideally exceeds the minimal system necessities and also you’re conscious of the dearth of any indication that a picture is processing, utilizing Neo is far much less irritating than it was once.
Is It Price Shopping for Luminar Neo?

The flexibility to purchase Neo as a one-off buy is especially enticing.
Purchase Luminar Neo if:
- You need to save time enhancing photographs – there’s no denying how helpful the AI instruments are in Lumianr Neo. There’s no easier and quicker option to carry out sure complicated edits, and the one-click presets make your photographs undeniably prettier.
- You don’t need to pay for an Adobe subscription – whereas Luminar Neo is unquestionably not a substitute for Lightroom or Photoshop, it does supply a lot of their instruments and several other that don’t exist on both platform.
Luminar Neo might be purchased outright for a similar value as a couple of months’ Adobe subscription, making it nice worth for cash.
- You discover Photoshop too sophisticated – once more, they’re very totally different packages, however Neo will help you carry out sophisticated picture edits in seconds that will take you hours in Photoshop.
- You need to have enjoyable together with your picture enhancing – enjoying round in Neo is enjoyable. The interface encourages experimentation and power labelling is generally easy and self-explanatory.
- You’re a heavy Instagram person and want a easy option to polish and share photographs
Don’t Purchase Luminar Neo if:
- You want highly effective picture administration instruments – Neo is extra of a photograph browser than it’s a picture supervisor. The disctinct lack of keywording/tagging/sorting instruments makes it a no-go for professionals who require this performance.
- You want varied print choices – there’s no option to print picture sheets, collages, and many others. You possibly can solely management print sizes from inside your laptop’s default printing app.
- You want an built-in cellular enhancing app – whilst you can wirelessly trasnfer photographs to and from Luminar Neo to the smartphone app, you may’t do a lot else with it. It’s a far cry from the wonderful Lightroom Cell app.
- You already personal Luminar AI – there’s little must improve at this level, until you really want one of many aforementioned instruments that the older software program is missing.
- You don’t have a robust PC or Mac – test the minimal system necessities beneath. When you don’t meet them, the enhancing expertise will likely be sluggish.
FAQs
Luminar Neo and Luminar AI are essentially related picture enhancing software program. Their layouts are associated, they each lack DAM performance and the core enhancing instruments are nearly equivalent.
In an e-mail interview I carried out final 12 months, Chief Product Evangelist Richard Harrington of Skylum stated that Luminar AI is a slower program than Neo, constructed on an older imaging engine. He added:
Luminar Neo incorporates a model new ‘modular’ engine which signifies that every a part of the enhancing course of might be optimized for the most effective speeds. Much less reminiscence is required to edit the photographs and updates to the software program can happen extra often.
One of many widespread complaints of Luminar AI was concerning the pace, so it is a welcome improve, though Neo is way from excellent.
Luminar Neo additionally affords a number of new instruments and options that differentiate it from Luminar AI, together with:
- Masks AI (coming quickly)
- Portrait Background Elimination AI (coming quickly)
- Relight AI
- Energy- line and dust-spot elimination
- Layer-based enhancing
Luminar Neo may also inherit options already current in Luminar AI, corresponding to the power to create presets, dodge & burn instruments, cloning, and the radial and gradient masks.
Though there’s no official assertion on this from Skylum, it’s possible that Luminar AI will finally be retired in favour of Neo, which can inherit all future updates and present AI options to render it redundant.
(One thing related occurred with Luminar 4, which was brushed beneath the carpet in 2021, a lot to the annoyance of present customers and followers of the software program – myself one in every of them!)
The ultimate distinction between Luminar Neo and Luminar AI is value, with Neo being barely dearer.
What are the System Necessities?
Mac:
- MacBook, MacBook Air, MacBook Professional, iMac, iMac Professional, Mac Professional, Mac mini, early 2010 or newer
- CPU Intel® Core™ i5 or higher
- Reminiscence 8 GB RAM or extra (16+ GB RAM is beneficial)
- macOS 10.14.6 or increased. IMPORTANT: macOS 10.13 isn’t supported.
- Laborious disk 10 GB free house; SSD for greatest efficiency
- Show 1280×768 measurement or higher
Home windows:
- Home windows-based {hardware} PC with mouse or related enter machine
- CPU Intel® Core™ i5 or higher, AMD Ryzen™ 5 or higher
- Open GL 3.3 or later appropriate Graphics Playing cards
- Reminiscence 8 GB RAM or extra (16+ GB RAM is beneficial)
- Working System Home windows 10 model 1909 or increased (solely 64-bit OS).
- Laborious disk 10 GB free house; SSD for greatest efficiency
- Show 1280×768 measurement or higher
What are the Supported Languages
- English
- German
- Spanish
- French
- Portuguese
- Italian
- Chinese language Simplified
- Chinese language Conventional
- Korean
- Russian
- Japanese
- Dutch
Extra data right here.
How A lot Does Luminar Neo Price?
Luminar Neo is on the market in 2 Plans: a Subscription for US$59 and a One-time buy for US$79.
(Each choices include a 30-day money-back assure.)
You possibly can select between 1 or 2 ‘seats’, permitting you to make use of Neo on 1 or 2 computer systems.
Our advice: Purchase Luminar Neo for a one-time buy with 2 seats. That is the most effective worth for cash.
There are different plans which embody a Luminar X Membership and varied presets as items – because the affords often change, faucet the button beneath to see precisely what’s obtainable as we speak.
Luminar Neo Promo Code – $10 Low cost
Skylum has supplied a restricted time Luminar Neo coupon code to avoid wasting $10 – use it quickly earlier than it expires.
Coupon Code: shotkit10neo
(The code may also be used along side any present discounted Neo value.)
To make use of the low cost code, click on the button beneath, then click on one of many Purchase Now buttons, then click on the blue ‘Enter Promotional Code’ textual content and enter shotkit10neo and at last click on Apply.
Last Phrases
There’s no denying that Luminar Neo has some spectacular celebration methods.
All the focus of the Skylum advertising and the furore surrounding its launch has been on these headline AI options, and in that, Neo fully delivers.
As a ‘common’ picture editor, it affords all of the instruments most photographers will ever want for a handbook enhancing expertise.
The place it falls quick, nevertheless, is as a one-stop-shop for all of your picture administration/enhancing wants – for this reason it’s additionally been developed as a free plugin for Lightroom, a far superior DAM.
At first, I assumed knowledgeable photographer like me would don’t have any want for Luminar Neo, however I used to be flawed. Actually, I discover myself opening Neo to carry out fast picture edits that will usually take for much longer, or simply merely to have a mess around with my photographs.
It’s on this experimentation that I’ve grown to take pleasure in utilizing Luminar Neo – enhancing photographs is now not a laborious process, or a method to an finish.
Moreover, for newbie photographers or these merely unaccustomed to complicated post-production methods, Luminar Neo is a silver bullet to attaining issues that will in any other case be unimaginable.
When you settle for Luminar Neo for what it’s, it’s arduous to withstand. It’s a easy, highly effective, pleasant and inexpensive software program which continues to enhance.
Unique Low cost
Highly effective AI enhancing instruments enhance photographs in much less time. Inexpensive one-time pricing and thrilling future updates. Use coupon code shotkit10neo to avoid wasting $10.
Disclaimer: All suggestions are neutral and based mostly on person expertise, with no bias towards the merchandise or the model. The merchandise on this publish could comprise affiliate hyperlinks.
[ad_2]