


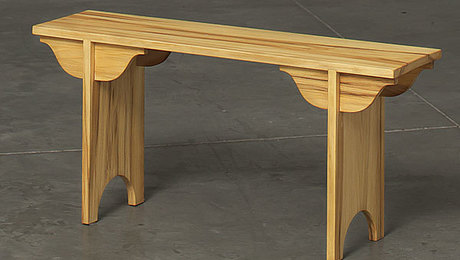
[ad_1]

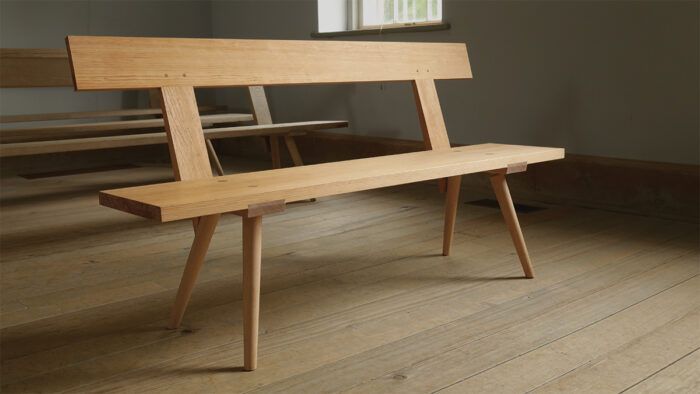
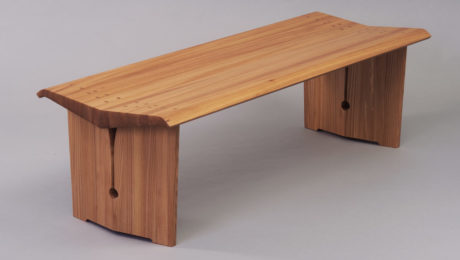
Synopsis: With a protracted and storied historical past going again to the early 1800s in Iowa’s Amana colonies, this bench is constructed to outlive being damaged down and transported, and used each week by church members. But regardless of its utilitarian previous, it has a fairly thrilling design. The legs use staked joinery to connect to the seat and battens, that are joined with sliding dovetails. The seat and splat are linked with a knockdown joint, with an angled tenon. And the again relaxation connects to the splat with drawbore pegs.
The second I first noticed one among these benches in a church in Iowa’s Amana colonies, I wished to construct one. After researching the benches’ historical past with Amana historian Peter Hoenle, I found that the unique benches had been made in Ebenezer (now West Seneca), N.Y., within the early 1800s for the church buildings of the Neighborhood of True Inspiration, a communal society that also exists. The benches, with their detachable backs, had been transported from New York to Iowa in 1846 when your entire group relocated to close Iowa Metropolis. The vast majority of the benches, some upwards of twenty-two ft. lengthy, are nonetheless used every week by members of the church. I scaled down the bench to five ft. to raised slot in a typical residence. I additionally used hickory for the legs and battens and pine for the remainder.
For a seemingly spartan design, the joinery is fairly thrilling—and it’s all seen. The legs use staked joinery to connect to the seat and battens, which themselves are joined by way of sliding dovetails. The seat and splat are linked with a knockdown joint, whose angled tenon requires particular care. A tapered wedge locks the joint. To high all of it off, the again relaxation connects to the splats with drawbore pegs. It appears like loads, however it’s price it; the originals have been going robust for almost 200 years.
Just a few elements, joined properly
Benches with this design have lasted almost 200 years because of tapered, staked joinery, sliding dovetails, and well-considered mortise-and-tenons.
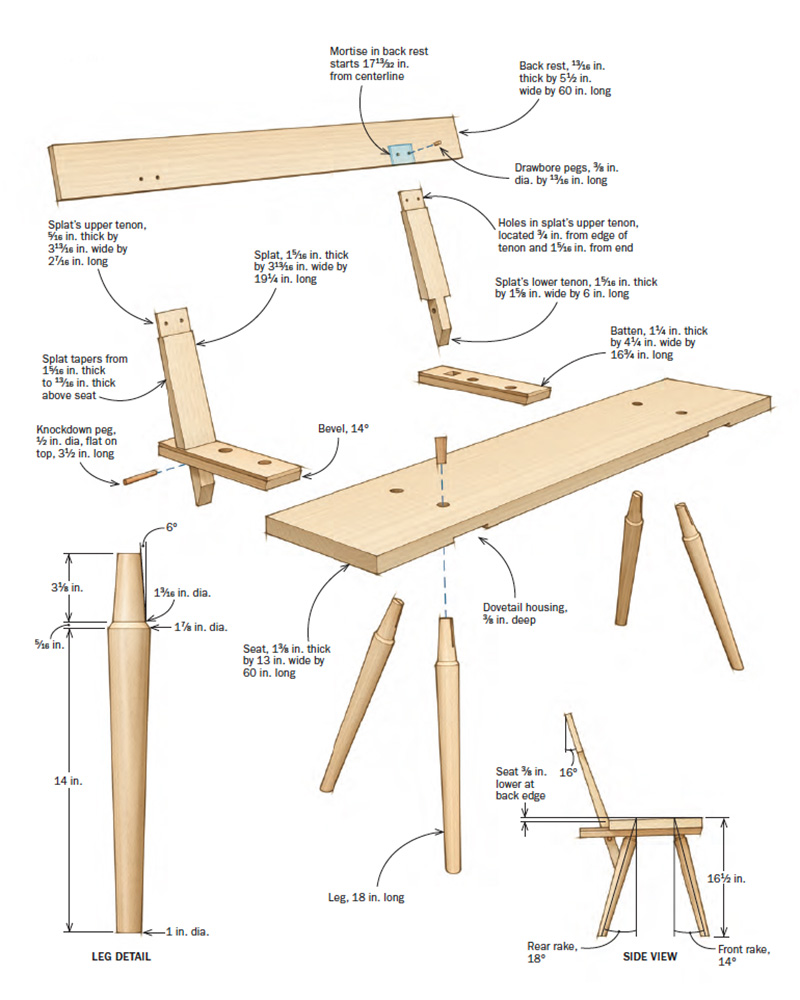


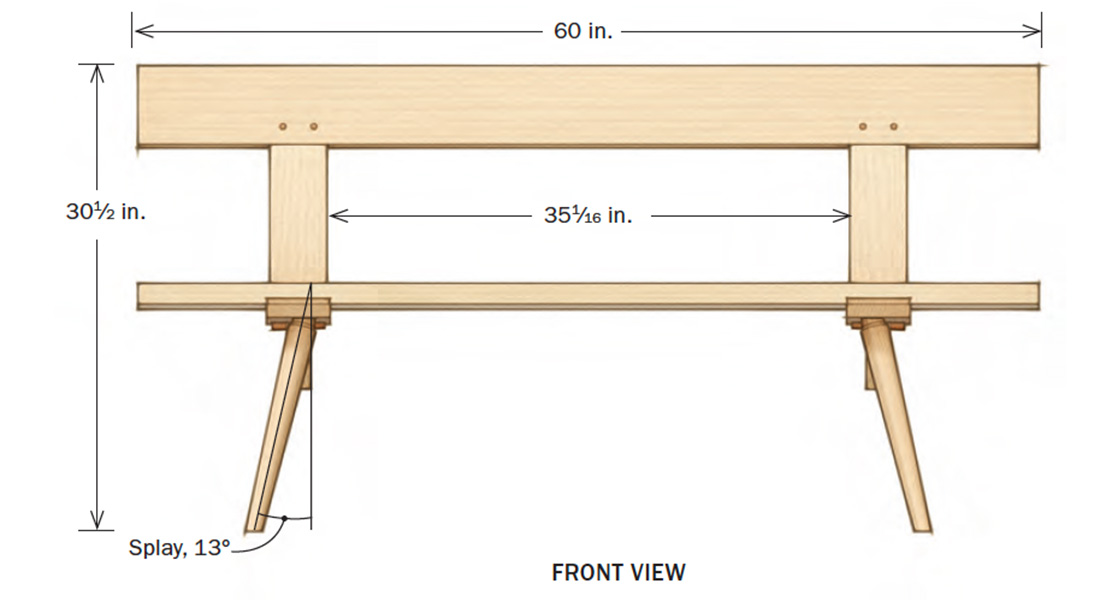
Battens with sliding dovetails
Executed proper, the sliding dovetails create a stable mechanical joint that additionally advantages from glue. Reduce the housings first. After clearing many of the waste with a dado stack, I take advantage of a router and jig to create the flared facet partitions. I then use the identical dovetail bit within the router desk to chop the dovetail on the battens. Solely mild mallet faucets must be wanted to assemble the joint. I depart the battens about 1 in. lengthy for becoming. The seat will get angled notches at its again edge to make room for the angled splats. Hint every splat onto the seat to put out the notch’s width. Noticed and chop the joint first, then refine it with an angled paring block, deepening it till the notch’s high edge meets the highest face of the seat on the very nook. Blue tape or a backer strip on the high of the seat can assist management blowout. Then chop the ends for good, crisp shoulders.
Dovetail battens are the center of the seat
 |
|

|
|  |

|
|
|


|
|
|


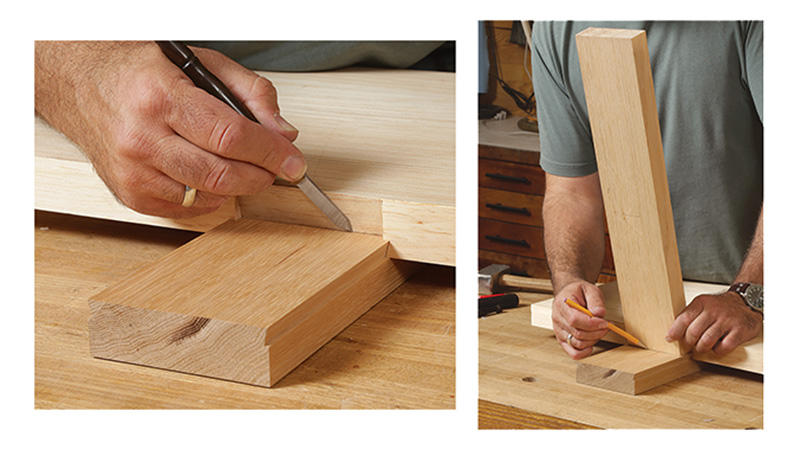

Angled mortise-and-tenons
Angled through-mortises within the battens settle for the lengthy splat tenons. Though this can be a knockdown joint, it yields an extremely inflexible construction.
To put out the mortise for the splat, I drive a batten into its housing till it’s 1 ⁄8 in. proud on the entrance fringe of the seat. Then I knife a line the place the batten meets the notch to mark the entrance of the mortise. To mark the again, I maintain a splat clean within the notch and hint in opposition to it with a pencil. A pencil line is okay right here since I’ll aircraft the longer term tenon to suit.
After eradicating the batten to put out the remainder of the mortise, together with transferring it to the batten’s backside face, I drill and chop away many of the waste, then rigorously chisel the ends with an angled paring information block clamped to the batten.
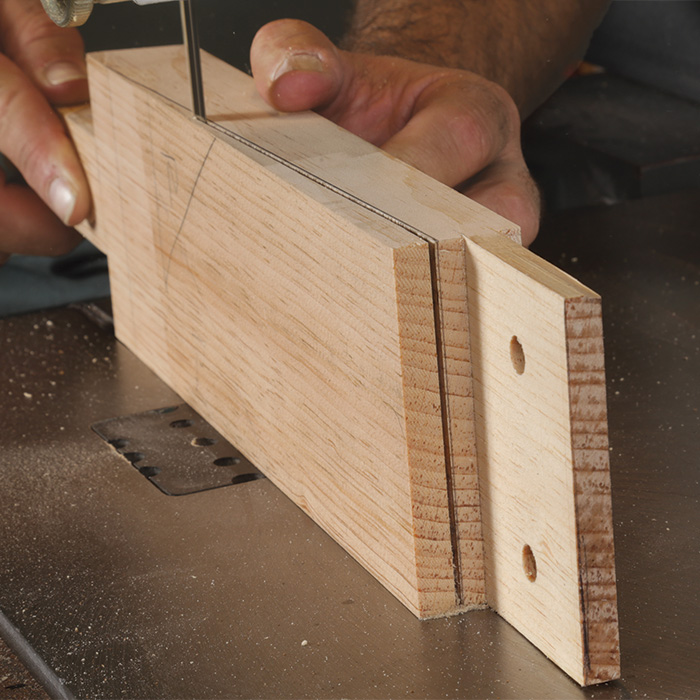
With the mortise executed, flip to the accompanying tenon on the splat. To ensure the splat strains up completely with the notch behind the seat, place the splat proper on its batten and use the mortise to mark the tenon’s width. I reduce the cheeks on the bandsaw, chop the shoulders with a chisel, and shave down the thickness with a handplane. Go away this tenon lengthy for now. You’ll reduce it to size later when the bottom is assembled. Do test its match although. Insert the splat into the batten, then faucet the batten till the splat tightens as much as the notch. There must be no hole the place the splat meets the highest of the seat.
With the splat nonetheless tight in opposition to the notch, mark the entrance of the batten to size. After slicing at this mark, I reduce the bevel on the batten’s entrance finish for a pleasant shadow line.
Lastly, set up the batten. When driving it, cease a few inches from the entrance of the seat, apply some glue to the housing, set up the splat, then drive the batten till the splat seats in opposition to the notch. Clamp the entrance of the batten to the seat to shut any gaps, take away the splat, and let the glue treatment.
Splats are knockdown and drawbored
|
|
|


|
|
|


 |
|


Again relaxation is drawbored
The joinery for the again relaxation, a straight mortise-and-tenon, is a break from the angled work up to now. Its drawbore means it’s no much less fascinating although. Once more, lay out the joints utilizing the elements themselves. Insert the splats into the battens and clamp the again relaxation to them, utilizing spacers to set the right peak. Regardless that I haven’t reduce the splats’ higher tenons but, this setup permits me to make use of a knife to mark the size of the mortise on the again relaxation and the shoulder on the splats.
The again relaxation’s mortises are centered within the inventory, however the splat’s corresponding tenons are offset towards the again so the taper might be reduce into the splat’s entrance face.
After the joints have been fitted, dry-assemble the again relaxation and splats to put out the splat’s taper, which runs from the highest of the seat to the again relaxation. The taper provides the sitter a bit of ergonomic consolation— a welcome consideration from an austere piece of furnishings.
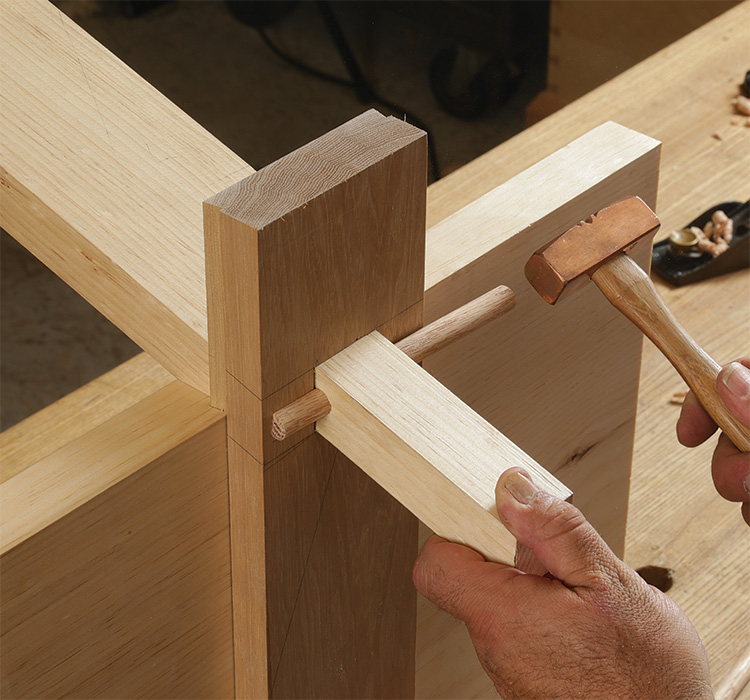
Lastly, lay out and drill for the drawbore pegs. I don’t glue this joint; the pegs are adequate. However don’t assemble it but. There’s nonetheless extra to do: the knockdown joint. Right here, tapered pegs run via angled holes within the splats’ decrease tenons. The wedging motion retains the splats tight to the battens—and allows you to take the bench aside for cross-country strikes.
Legs are turned and staked


Staked undercarriage helps again
Even with its little tweaks and added curiosity, the joinery till now’s typical of flat work. The legs, although, are firmly in chair territory, with turned, tapered tenons and matching tapered mortises.
I flip the tapered legs and their tenons. The tenons must be smaller than the biggest diameter your reamer can reduce. Whereas you should use the measured drawing as a tenet when sizing the tenon, your particular person reamer will decide the precise dimensions.
The rake, splay, and place of the legs had been designed so the beveled ends of the splats’ beveled tenons relaxation firmly on the backs of the rear legs. This triangulation is what makes the bench so robust.
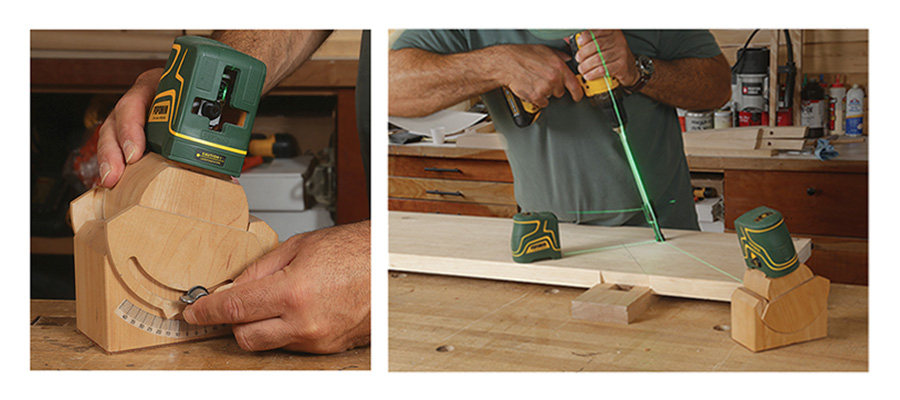
I take advantage of a pair of cheap laser ranges, one plumb and one in a shopmade adjustable mount, to forged sightlines onto my drill and reamer. I often flip the lights off within the store so the laser beams are extra seen.
Begin by drilling via the seat and batten from the highest. This can isolate blowout to the underside, the place it will likely be eliminated whenever you flip the seat to ream from under. Maintain the drill and your elbows near your physique for the perfect management.
When reaming, heart the lasers on the outlet by eye. The lasers ought to stroll up the reamer and meet on the center of the highest of the software. Ream slowly and punctiliously, taking frequent breaks to filter the waste and checking that you just’re nonetheless aligned along with your lasers. You can skip the reaming and use straight tenons, like lots of the authentic benches do, however the joint wouldn’t be as robust.
Earlier than gluing the legs into the seat, I drive them into the mortises dry and mark the tenon on the underside of the batten. Solely after that do I reduce the kerf for the wedge. This permits me to seat the tenon with out the tapered mortise closing the kerf. I apply glue to the tenon and the mortise. I then drive the tenons into the seat, stopping on the marks. I take advantage of liquid disguise glue for its prolonged open time. Then I glue and drive the wedges, which must be about 1 ⁄ 16 in. wider than the tenon so its edges chunk into the seat. I apply glue to just one facet of the wedge so if the tenon shrinks, it strikes away from the wedge on the unglued facet as a substitute of pulling away from the mortise. As soon as the glue cures, noticed the tenons flush and easy the highest of the seat.
The bottoms of the legs must be reduce to size. Place the bench on a flat floor (I take advantage of my workbench high) and shim it so the seat is stage left to proper and angled down entrance to again. Now measure 16-1 ⁄ 2 in. down from the entrance fringe of the seat and set a pair of dividers to the gap between the 16-1 ⁄ 2 in. mark and the highest of the workbench. Use the dividers (I take advantage of the Accuscribe made by Fastcap) to mark a line across the backside of every leg. Noticed to the road with a backsaw and chamfer the reduce.
The again meeting has two closing steps, trimming and angling the splats’ decrease tenons to size and attaching the again relaxation.
Every splat’s decrease tenon must be reduce to express size and beveled on the finish so it rests evenly on the again of the leg. Get this info, each the size of the tenon and the angle of the bevel, from the bench itself. I are inclined to noticed the tenon lengthy, then sneak up on the precise match with a aircraft till the bevel rests behind the leg simply because the splat bottoms out within the batten. Deal with every tenon’s size and angle independently. With the splats fitted to the legs, drawbore the again relaxation to the splats.
I gave my bench a cleaning soap end, which is what the unique benches have. They’re nonetheless maintained with cleaning soap, and actually, contained in the church in Amana the place I first noticed them there’s a sill cock and central drain for laundry the wooden flooring and benches.
Assemble across the seat

|
|
|


|
|
|


Jameel Abraham is a woodworker and toolmaker in Cedar Rapids, Iowa.
Drawings by Christopher Mills.
If you happen to’re searching for extra chairs, benches and stools, try our mission information right here.
 | Constructing Neighborhood of Benches |
Construct Traditional Shaker Bench | |
 | Museum Bench |

[ad_2]